Sun Fire X4540 for ZFS

Vor einiger Zeit kam ich über Twitter User smay4finger (Danke Stefan) an zwei Sun Fire X4540 Server. Diese wurden von Sun Microsystems speziell für das ZFS (Zettabyte File System) entwickelt. Das X4500 System ist zwar schon etwas in die Jahre gekommen, eignet sich aber sehr gut um mit ZFS zu experimentieren. Besonders interessant ist die BETA von TrueNAS CORE, welche die neuste Version von OpenZFS mitbringt. TrueNAS CORE verspricht viele Verbesserungen in der Performance und eine neue Version von FreeBSD. Die genauen Infos dazu stehen im diesem Blogbeitrag.
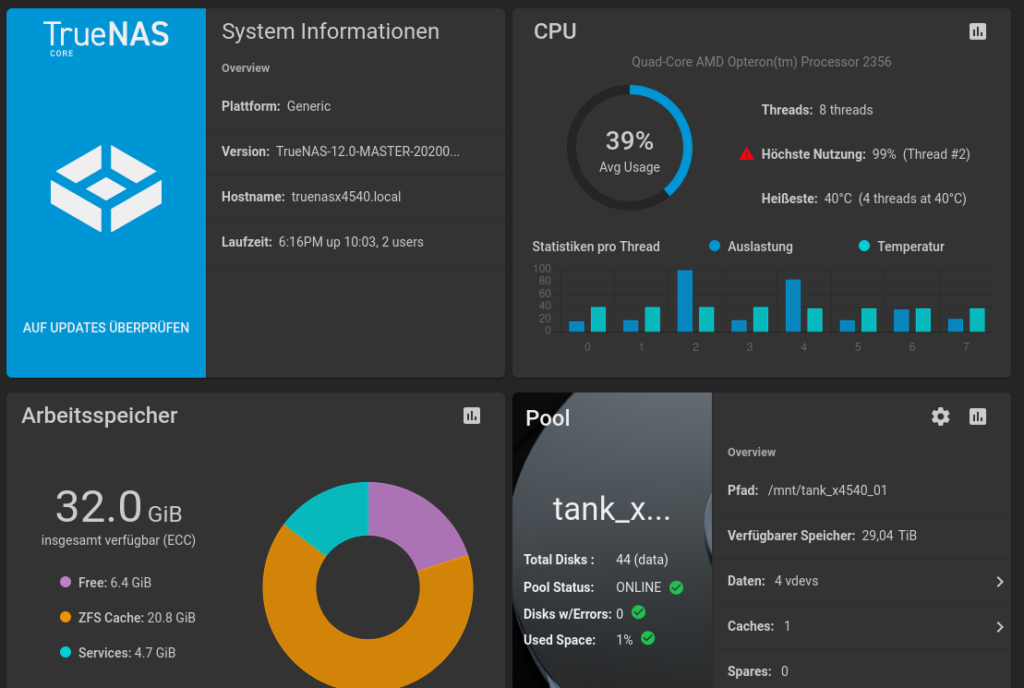
Meine Erfahrung mit TrueNAS CORE auf der X4540 waren überraschend gut, wenn man bedenkt das nur zwei AMD Opteron 2356 Quad-Core zum Einsatz kommen und das System mit relativ langsamen RAM arbeitet. Zum Test des ZFS Pools habe ich eine 10G Netzwerkkarte Chelsio CC2-N320E-SR auf einen von drei PCIe Ports verbaut. Der ZFS Pool besteht aus 44 Festplatten, eine L2ARC Cache SSD und LOG SSD. Der Pool wurde in 4 vdev unterteilt mit je 11 Platten im raidz2.
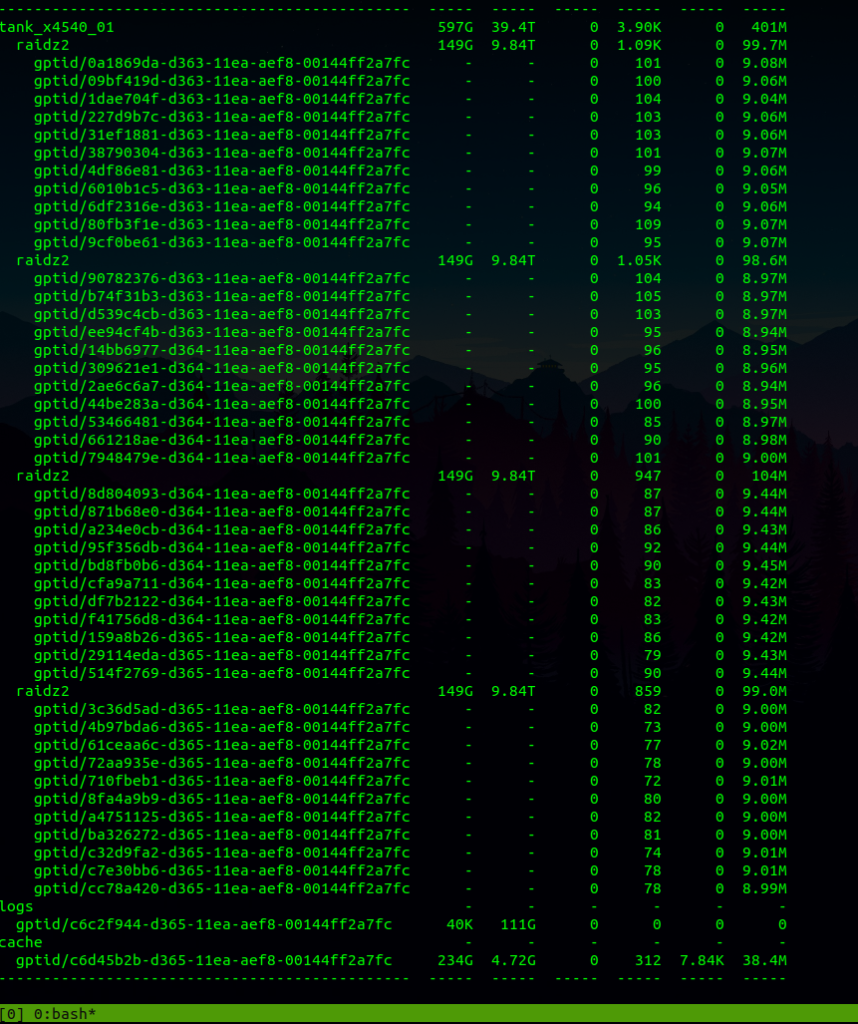
ZFS Replikation FreeNAS > TrueNAS CORE BETA1

Ein kurzer Test des 10G Netzwerks mit iperf ergab, dass über 6G konstant übertragen werden. Mehr gibt der PCIe nicht her. Nun habe ich von einer anderen FreeNAS Maschine eine ZFS Replizierung gestartet. Die Übertragungsgeschwindigkeit von FreeNAS zum TrueNAS war etwas ernüchternd lief aber mit 200-300 MB/s stabil. Bei der Replizierung von TrueNAS zum FreeNAS zeigte sich eine starke Steigerung mit etwas über 600 MB/s im Peak.

Die Versuche habe ich mit einem älteren Entwicklungsstand von TrueNAS CORE durchgeführt. Mit der BETA2 wurde jetzt eine weitere Performancesteigerung von bis zu 30{027d6993231faddb337e664597f716f9976dd523c8f25bd8576d8a04cde887d6} angekündigt. Nach dem Update werde ich die Tests wiederholen und genauer dokumentieren.

Warum experimentiere ich überhaupt auf der alten Sun Fire X4540? Zum Einen möchte ich zeigen, dass auch ältere Hardware sehr gut für ZFS geeignet ist – zum Anderen bietet sie mir eine tolle Möglichkeit ZFS und seine Eigenschaften zu verstehen, ohne mein reguläres Live-System zu verändern. Die verschiedenen Konfigurationsmöglichkeiten eines Pools zu testen, Auswirkungen von vdev, cache und log zu untersuchen sowie ein Gefühl für die Performance und Stabilität des Systems zu bekommen. Zum Abschluss noch ein Video von der X4540:

English version:

Some time ago I got two Sun Fire X4540 servers via Twitter user smay4finger (Thanks Stefan). These were developed by Sun Microsystems especially for the ZFS (Zettabyte File System). The X4500 system is a bit old, but it’s very good for experimenting with ZFS. Especially interesting is the BETA of TrueNAS CORE, which brings the latest version of OpenZFS. TrueNAS CORE promises many performance improvements and a new version of FreeBSD. The exact information about this can be found in this blog post.

My experience with TrueNAS CORE on the X4540 was surprisingly good, considering that only two AMD Opteron 2356 Quad-Core are used and the system works with relatively slow RAM. To test the ZFS pool I installed a 10G network card Chelsio CC2-N320E-SR on one of three PCIe ports. The ZFS pool consists of 44 hard drives, a L2ARC Cache SSD and LOG SSD. The pool was divided into 4 vdev with 11 disks each in raidz2.
A short test of the 10G network with iperf showed that over 6G is constantly streamed. The PCIe does not provide more. Next I started a ZFS replication from another FreeNAS machine. The transfer speed from FreeNAS to TrueNAS was a bit poor but ran stable around 200-300 MB/s. Replication from TrueNAS to FreeNAS showed a strong increase with a little over 600 MB/s at peak.

I did the tests with an older version of TrueNAS CORE. With BETA2 a further performance increase of up to 30{027d6993231faddb337e664597f716f9976dd523c8f25bd8576d8a04cde887d6} has been announced. After the update I will repeat the tests and document them more precisely.

Why am I experimenting on the old Sun Fire X4540 at all? On the one hand I want to show that older hardware is also very well suited for ZFS – on the other hand it gives me a great opportunity to understand ZFS and its features without changing my regular live system. To test the different configuration options of a pool, to investigate the effects of vdev, cache and log and to get a feeling for the performance and stability of the system.
Jitsi meet server open-source video conferencing

Jitsi meet

Ich hatte das Bedürfnis einen freien Video Chat Server einzurichten für Freunde, Familie und alle anderen die das gebrauch könnten. Da ich generell versuche open-source Software einzuätzen bin ich auf Jitsi gestoßen. Hier geht es zur Projekt Webseite: https://jitsi.org/ Viel will ich dazu nicht erklären, das Netz ist voll damit. Aber es gab das ein oder andere Problem und ich möchte die Lösung dokumentieren.

Den Jitsi Server habe ich auf Proxmox Virtualisiert, als System kommt Linux mit Ubuntu 18.04 LTS zum Einsatz. Was wird noch gebraucht? Java OpenJDK und Nginx Webserver müssen vor der Installation von Jitsi installiert werden. Ein Let’s Encrypt Zertifikat richte ich nicht auf diesem Server ein da ich pfSense mit HA Proxy als Reverse Proxy und ACME betreibe. Somit macht die pfSense Let’s Encrypt Zertifikate und ich muss das nicht für jeden Webserver neu generieren.

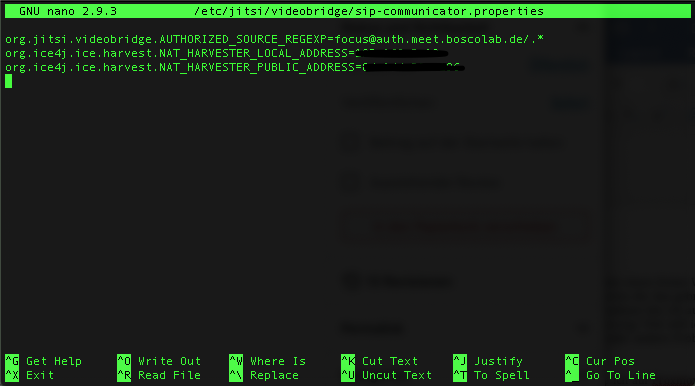
Kommen wir nun zu den aufgetretenen Problemen. Der Server war soweit bereit und der erste Test im internen Netzwerk war erfolgreich. Als ich jedoch einen Chat Raum mit einem externen Client aufbauen wollte gab es weder Audio noch Video. Der Raum selbst war ok und ich konnte Textnachrichten versenden. Lag es eventuell an den UDP Port 10000? Nein, in der Config von /etc/jitsi/videobridge/sip-communicator.properties müssen folgende Zeilen eingetragen werden.

org.ice4j.ice.harvest.NAT_HARVESTER_LOCAL_ADDRESS=<Local.IP.Address>
org.ice4j.ice.harvest.NAT_HARVESTER_PUBLIC_ADDRESS=<Public.IP.Address>

Es stellte sich heraus das die Public IP Adresse tatsächlich eine IP sein muss. Der Server kann kein DNS auflösen. Das bedeutet, wenn man einen DSL Anschluss mit dynamischer IP verwendet, kann man die DNS zum Auflösen der IP nicht in die Config eintragen.

/etc/jitsi/videobridge/sip-communicator.properties

Nach ein paar Recherchen bemerkte ich das dieses Problem viele haben. Eine Lösung gibt es bis jetzt nicht. Jedoch habe ich das Problem mit Marcel twitter.com/_mmo besprochen und wir arbeiten an einem passenden Cron Job der die IP automatisch in der /etc/jitsi/videobridge/sip-communicator.properties austauscht.

Bis der Cron Job fertig ist muss die IP manuell getauscht werden. Wer andere Lösungen hat bitte eine Mail an mich input@boscolab.de

English version:

I had the need to set up a free video chat server for friends, family and anyone else who could use it. Since I generally try to use open source software, I came across Jitsi. Here is the project website: https://jitsi.org/ I don’t want to explain much about it, the network is full of it. But there were one or two problems and I want to document the solution.

I virtualized the Jitsi server on Proxmox, as a system Linux with Ubuntu 18.04 LTS is used. What else is needed? Java OpenJDK and Nginx web server must be installed before installing Jitsi. I do not set up a Let’s Encrypt certificate on this server because I run pfSense with HA Proxy as a reverse proxy and ACME. So pfSense Let’s Encrypt makes certificates and I don’t have to regenerate them for every web server.

Now we come to the problems encountered. The server was ready so far and the first test in the internal network was successful. However, when I wanted to set up a chat room with an external client, there was no audio or video. The room itself was ok and I could send text messages. Was it possibly due to UDP port 10000? No, the following lines must be entered in the config of /etc/jitsi/videobridge/sip-communicator.properties.

org.ice4j.ice.harvest.NAT_HARVESTER_LOCAL_ADDRESS=<Local.IP.Address>
org.ice4j.ice.harvest.NAT_HARVESTER_PUBLIC_ADDRESS=<Public.IP.Address>

It turned out that the public IP address must actually be an IP. The server cannot resolve DNS. This means that if you use a DSL connection with dynamic IP, you cannot enter the DNS in the config to resolve the IP.

After doing some research, I noticed that many had this problem. So far there is no solution. However, I discussed the problem with Marcel twitter.com/_mmo and we are working on a suitable cron job that automatically exchanges the IP in the /etc/jitsi/videobridge/sip-communicator.properties.

The IP must be exchanged manually until the cron job is finished. Anyone who has other solutions please email me at input@boscolab.de

Neue Hardware für FreeNAS / Replacing an old Supermicro server with FreeNAS to a new one

Eigentlich bin ich zufrieden mit meinem FreeNAS Server, es ist ein  Supermicro mit 8 Einschüben, 2x Intel Xeon E5620 und 64GB ECC RAM, 8x 4TB WD RED also 24TB RAW Storage. Dazu noch ein paar 10G Netzwerkkarten. Jedoch hat das Motherboard nur PCIe 2.0, die IPMI lässt sich nicht mehr ansprechen und auch das Bios Update hat nicht den gewünschten Erfolg gebracht. Ich habe mich daher entschieden die Hardware zu tauschen. Die Supermicro Gehäuse und Motherboard sind in meinen Augen die einziehen Lösung für mich.

Der neue FreeNAS Server mit Supermicro Hardware hat 2x Intel E5-2620, 64GB ECC RAM und erhält zusätzlich eine weitere HBA (Horst Bus Adapter) Karte von HP, H220 mit Firmware 15.10. in IT Mode.

Die ganze Prozedur habe ich in meinem ersten YouTube Video festgehalten.

Actually, I’m happy with my FreeNAS server, it’s a Supermicro with 8 slots, 2x Intel Xeon E5620 and 64GB ECC RAM, 8x 4TB WD RED so 24TB RAW storage. In addition still a few 10G network maps. However, the motherboard has only PCIe 2.0, the IPMI can not be addressed and also the BIOS update has not brought the desired success. So I decided to swap the hardware. The Supermicro housings and motherboard are in my opinion the feeding solution for me.

The new FreeNAS server with Supermicro hardware has 2x Intel E5-2620, 64GB ECC RAM and additionally receives another HBA (Horst Bus Adapter) card from HP, H220 with firmware 15.10. in IT fashion.

I recorded the whole procedure in my first YouTube video. https://youtu.be/TNtZKsTXFc4

Bosco Lab neuer Blog / Bosco Lab’s new blog

Hallo Internet,

das wird mein neuer Blog über Themen die mich im Alltag beschäftigen und die ich mit euch teilen möchte. Vielleicht kann ich dem einen oder anderen damit Helfen. Sicher gibt es viele Blogs wie diesen, jedoch möchte ich es dennoch versuchen.

In den kommenden Wochen und Monaten werde ich zu den verschiedensten Themen kleine Beiträge schrieben. Hier und da noch ein Video dazu drehen. Sollte das hier tatsächlich jemand lesen und derjenige hat auch noch Kritik, Fragen oder Anregungen für mich dann immer her damit. Schreib einfach eine Mail an input@boscolab.de.

Ein paar Themen dich ich in der Zukunft hier anreisen werde: Linux, Unix, Netzwerk, Server, proxmox, FreeNAS, macOS, Ubuntu, Debian, Telex, iSCSI, reverse proxy, pfSense, sun oracle und so viel mehr.

bis dann…

Bosco


Hello internet,


this will be my new blog about topics that concern me in everyday life and that I would like to share with you. Maybe I can help one or the other with that. Sure, there are many blogs like these, but I still want to try it.


In the coming weeks and months, I will write small contributions on a variety of topics. Here and there turn a video about it. Should anyone actually read this and the person has criticism, questions or suggestions for me then always with it. Just write an email to input@boscolab.de.


Here are a few topics I’ll be traveling to in the future: Linux, Unix, Network, Server, proxmox, FreeNAS, macOS, Ubuntu, Debian, Telex, iSCSI, reverse proxy, pfSense, sun oracle and so much more.

See you…

Bosco

WordPress Appliance - Powered by TurnKey Linux